Easy No Bake Peanut Butter Granola Cups
No Bake Peanut Butter Granola Cups are about to become your new favorite obsession. Seriously, if you’re anything like me, the mere thought of combining creamy peanut butter and crunchy granola into a perfectly portioned, no-bake treat is enough to make your taste buds do a happy dance. These delightful little cups are a testament to the magic that happens when simple ingredients come together with minimal effort. What makes them so incredibly special? It’s their sheer versatility and irresistible combination of textures and flavors. They’re the perfect sweet escape for a busy afternoon, a satisfying post-workout reward, or a crowd-pleasing party snack that everyone will adore. You’ll love how quickly they come together, and even more, you’ll love how utterly delicious these No Bake Peanut Butter Granola Cups are, without ever needing to turn on the oven.
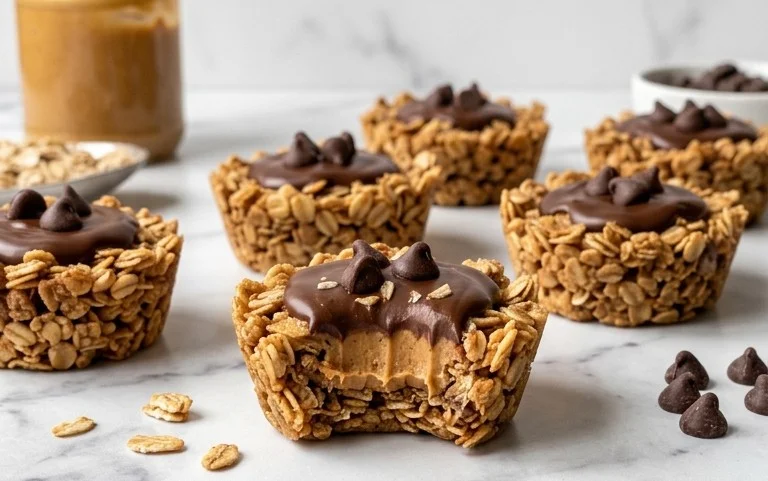
No Bake Peanut Butter Granola Cups
Get ready to whip up a batch of pure deliciousness with these incredibly easy No Bake Peanut Butter Granola Cups! These delightful treats are perfect for satisfying those sweet cravings without turning on the oven. Imagine a perfect harmony of crunchy granola, salty peanuts, creamy peanut butter, and rich dark chocolate – all coming together in a bite-sized package. They’re so simple to make, you’ll wonder why you haven’t tried them sooner. Plus, they’re fantastic for meal prep, lunchboxes, or just as a little pick-me-up any time of day. Let’s dive into what you’ll need to create these little miracles.
Ingredients:
- 2 ½ cups granola
- 1 cup peanuts-chopped
- 3 Tablespoons peanut butter (for the filling)
- 3 Tablespoons honey (or more if needed for sweetness and binding)
- 1 cup peanut butter (melted, for the filling base)
- Topping:
- 12 oz. dark chocolate-finally chopped
- 1 Tablespoon coconut oil
Creating the Delicious Filling
The magic of these cups starts with the base filling. It’s a simple yet incredibly satisfying blend that forms the heart of our treat. This part is where we bring together the granola, chopped peanuts, and that wonderful peanut butter and honey combination. The melted peanut butter acts as a binder, coating everything and creating that signature peanut butter flavor we all love. The honey not only adds a touch of sweetness but also helps everything stick together beautifully.
First, in a large mixing bowl, combine your 2 ½ cups of granola and 1 cup of chopped peanuts. Give them a good stir to ensure they are evenly distributed. Next, add the 3 tablespoons of peanut butter to this dry mixture. Don’t worry if it looks a little clumpy at this stage; that’s perfectly normal. Now, it’s time for the honey. Pour in 3 tablespoons of honey. You might find that depending on the dryness of your granola or the thickness of your peanut butter, you might need a little more honey to achieve a consistency that holds together well when pressed. Aim for a mixture that is slightly sticky and can be pressed into the muffin liners without crumbling too much. Gently but thoroughly mix all these ingredients together. You can use a spoon or spatula, or even your clean hands for the best results, ensuring every piece of granola and peanut is coated. The goal here is a cohesive mixture.
Assembling the Cups
Now that our flavorful filling is ready, it’s time to get them into their cups! We’ll be using a standard muffin tin lined with paper liners for this. This makes them super easy to remove and serve.
Take your muffin tin and line each cup with a paper liner. I like to use standard-sized liners, but you can use mini muffin liners for smaller, more bite-sized treats. Spoon about 1 to 2 tablespoons of the granola and peanut butter mixture into each paper liner. Press this mixture down firmly into the bottom of each liner. You want to create a compact layer that will hold its shape. The firmer you press, the less likely your cups are to fall apart. You can use the back of your spoon, a small glass, or even a flat-bottomed measuring cup to get a nice, even surface. This base layer is crucial for the structure of your no-bake cups.
The Rich Chocolate Topping
No peanut butter cup is complete without a decadent chocolate topping! This is where we add that irresistible outer layer of chocolate that contrasts so wonderfully with the peanut butter filling.
To prepare the chocolate topping, you’ll need to melt your 12 ounces of finely chopped dark chocolate. You can do this using a double boiler or in the microwave. If microwaving, place the chopped chocolate in a microwave-safe bowl and heat in 30-second intervals, stirring well after each interval, until the chocolate is smooth and melted. Be careful not to overheat the chocolate, as it can seize and become unusable. Once the chocolate is melted, stir in 1 tablespoon of coconut oil. The coconut oil helps to make the chocolate smoother and gives it a lovely sheen, as well as contributing to a nice snap when it sets. Stir until the coconut oil is fully incorporated and the chocolate is glossy and pourable.
Now, carefully spoon or pour the melted dark chocolate over the pressed granola filling in each muffin liner. Make sure to cover the filling completely, creating a nice, even chocolate shell. You can use a spoon to gently spread the chocolate if needed to ensure full coverage. Don’t worry if it’s not perfectly smooth; a slightly rustic look is charming!
Setting and Enjoying
The final step is patience! Once all your cups are topped with chocolate, it’s time to let them set and become the delicious treats we’ve envisioned.
Carefully place the muffin tin in the refrigerator. Allow the cups to chill for at least 1-2 hours, or until the chocolate has completely hardened. You can also speed up the process by placing them in the freezer for about 30-45 minutes. Once they are fully set, gently remove the granola cups from the muffin tin. If they seem a little stuck, you can carefully peel back the paper liner to help release them.
And there you have it – your homemade No Bake Peanut Butter Granola Cups are ready to be devoured! They are best stored in an airtight container in the refrigerator to keep the chocolate firm and the filling fresh. These are perfect for sharing (if you can resist eating them all yourself!), and they make a wonderful homemade gift. Enjoy every delicious, no-bake bite!
Conclusion:
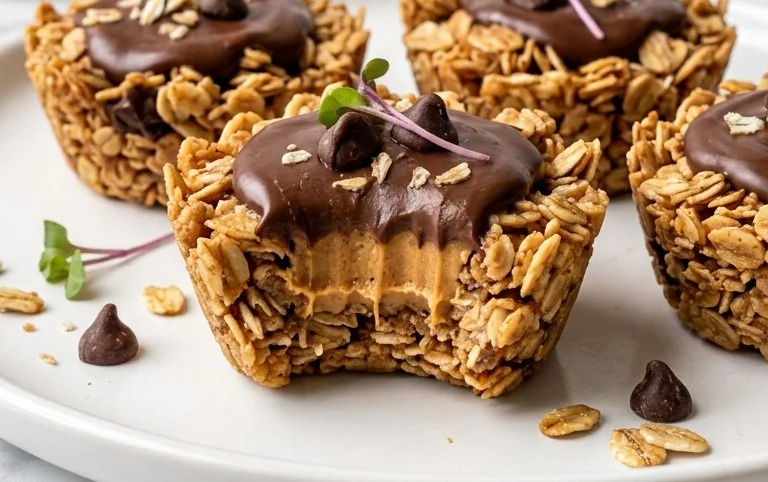
And there you have it – a simple, satisfying way to create delicious No Bake Peanut Butter Granola Cups right in your own kitchen! These little powerhouses are truly fantastic because they require no oven time, making them perfect for a quick treat or a healthy snack any day. The delightful crunch of granola paired with the creamy, salty sweetness of peanut butter is an irresistible combination that even picky eaters tend to love. They’re incredibly versatile, too, fitting seamlessly into a busy weekday breakfast, an afternoon pick-me-up, or even a light dessert.
For serving, I love to enjoy them straight from the fridge for that perfect firmness, but they’re also great at room temperature. They make an excellent addition to lunchboxes, post-workout fuel, or a guilt-free indulgence when a sweet craving strikes. Don’t be afraid to get creative with variations! Try different nut butters, add a sprinkle of chocolate chips, or incorporate dried fruits like cranberries or raisins. The possibilities are endless, and each variation offers a unique flavor profile.
I truly encourage you to give these No Bake Peanut Butter Granola Cups a try. You might be surprised at how easy and rewarding it is to whip up such a delicious and wholesome treat. It’s a recipe that’s destined to become a staple in your repertoire!
Frequently Asked Questions:
Q: How long do these No Bake Peanut Butter Granola Cups last in the refrigerator?
A: Stored in an airtight container in the refrigerator, these cups should stay fresh and delicious for up to a week. They tend to firm up nicely in the cold, which is how I prefer them!
Q: Can I make these cups vegan?
A: Absolutely! To make them vegan, simply ensure you are using vegan granola (check the ingredients for honey) and replace the optional honey or maple syrup with agave nectar or another vegan sweetener.
Q: What if I don’t have peanut butter? What other nut butters work well?
A: You have several excellent options! Almond butter, cashew butter, or even sunflower seed butter (for a nut-free alternative) all work wonderfully in this recipe. Just be aware that the flavor profile will shift slightly with different nut butters.
No Bake Peanut Butter Granola Cups
Quick and easy no-bake granola cups featuring peanut butter and chocolate.
Ingredients
-
2 ½ cups granola
-
1 cup peanuts-chopped
-
3 Tablespoons peanut butter
-
3 Tablespoons honey
-
1 cup peanut butter-melted
-
12 oz. dark chocolate-finally chopped
-
1 Tablespoon coconut oil
Instructions
-
Step 1
Line a muffin tin with cupcake liners. -
Step 2
In a large bowl, combine granola, chopped peanuts, peanut butter, and honey. -
Step 3
Stir until well combined. The mixture should be sticky enough to hold together. -
Step 4
Press about 1-2 tablespoons of the granola mixture into the bottom of each cupcake liner. -
Step 5
In a microwave-safe bowl, melt the 1 cup of peanut butter in 30-second intervals, stirring in between, until smooth. -
Step 6
Pour the melted peanut butter over the granola base in each liner. -
Step 7
In a separate bowl, melt the dark chocolate and coconut oil together until smooth, using 30-second intervals and stirring. -
Step 8
Pour the melted chocolate mixture over the peanut butter layer in each liner. -
Step 9
Place the muffin tin in the freezer for at least 30 minutes, or until the cups are set. -
Step 10
Remove from the muffin tin and enjoy.
Important Information
Nutrition Facts (Per Serving)
It is important to consider this information as approximate and not to use it as definitive health advice.
Allergy Information
Please check ingredients for potential allergens and consult a health professional if in doubt.