Easy Smores Krispie Bars No Bake Recipe
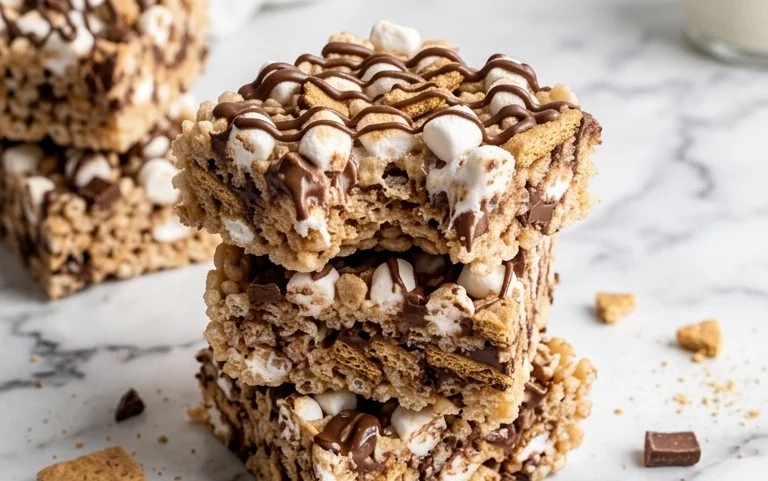
S’mores Krispie Bars are a delightful twist on a classic, blending the chewy, crispy texture of rice krispie treats with the beloved flavors of graham crackers, melty chocolate, and toasted marshmallows. There’s something undeniably magical about the combination of graham crackers, chocolate, and toasted marshmallows. It’s the flavor of childhood camping trips and backyard bonfires, all packed into a single, irresistible bite. These S’mores Krispie Bars capture that essence perfectly, transforming the classic s’mores experience into an easy-to-make, no-bake treat that’s ready in a flash. They have that signature gooey, crispy texture you love from a rice krispie treat, but with that unmistakable s’mores flavor profile. The best part? You don’t need a campfire or even an oven. This recipe is wonderfully straightforward, making it ideal for a quick dessert fix or a fun activity with kids. The simplicity of the ingredients means you likely have most of them on hand already, and the few steps involved are easy to follow. We’re essentially taking the beloved components of a s’more and binding them together in a chewy, crispy bar form. The melted marshmallows act as the glue, coating the cereal and holding everything in place, while the pockets of melted chocolate and crunchy graham crackers provide all the classic s’mores elements.
Ingredients:
- 6½ cups golden grahams cereal
- 4 tablespoons butter (I use salted)
- 7 cups mini marshmallows (divided)
- 3 bars (1.55 oz each) Hershey’s milk chocolate bars
S’mores Krispie Bars
There’s something undeniably magical about the combination of graham crackers, chocolate, and toasted marshmallows. It’s the flavor of childhood camping trips and backyard bonfires, all packed into a single, irresistible bite. These S’mores Krispie Bars capture that essence perfectly, transforming the classic s’mores experience into an easy-to-make, no-bake treat that’s ready in a flash. They have that signature gooey, crispy texture you love from a rice krispie treat, but with that unmistakable s’mores flavor profile. The best part? You don’t need a campfire or even an oven.
This recipe is wonderfully straightforward, making it ideal for a quick dessert fix or a fun activity with kids. The simplicity of the ingredients means you likely have most of them on hand already, and the few steps involved are easy to follow. We’re essentially taking the beloved components of a s’more and binding them together in a chewy, crispy bar form. The melted marshmallows act as the glue, coating the cereal and holding everything in place, while the pockets of melted chocolate and crunchy graham crackers provide all the classic s’mores elements.
Making Your S’mores Krispie Bars
Step 1: Prepare Your Pan and Melt the Butter
Before you start melting anything, it’s a good idea to get your baking pan ready. I like to use a 9×13 inch baking pan. To prevent the sticky marshmallow mixture from clinging to the pan, I grease it generously with butter or cooking spray. Alternatively, you can line the pan with parchment paper, leaving some overhang on the sides to make lifting the finished bars out easier. Once your pan is prepped, place a large pot or saucepan over medium-low heat. Add the 4 tablespoons of butter to the pot. You want the butter to melt completely without browning. Browning the butter can add an unwanted nutty flavor that isn’t typically part of a classic s’more, so keep an eye on it and stir occasionally until it’s fully liquid.
Step 2: Melt the Marshmallows and Add the Cereal
Once the butter has melted, it’s time to add the marshmallows. We’re going to use 6 cups of the mini marshmallows here, reserving the final cup for later to create those gooey pockets. Add the 6 cups of mini marshmallows to the melted butter in the pot. Continue to stir the marshmallows constantly over the medium-low heat. They’ll start to deflate and melt into a smooth, gooey mass. This process can take a few minutes, so be patient and keep stirring to prevent the marshmallows from scorching on the bottom of the pot. As soon as the marshmallows are almost completely melted and smooth, remove the pot from the heat. This is important because if the marshmallow mixture is too hot, it can make the cereal too crispy and the bars harder to handle. Now, immediately add the 6½ cups of golden grahams cereal to the pot. Gently fold the cereal into the marshmallow mixture until it’s evenly coated. It’s important to work relatively quickly here, as the marshmallow mixture will start to set as it cools.
Step 3: Incorporate the Chocolate and Press into the Pan
This is where the magic really happens and we get that s’mores flavor. Before pressing the mixture into the pan, break the 3 Hershey’s milk chocolate bars into small pieces. I find breaking them by hand into roughly ½-inch pieces works best. Sprinkle these chocolate pieces over the coated cereal in the pot. Add the remaining 1 cup of mini marshmallows as well. Now, gently fold everything together. You don’t want to overmix at this stage; you just want to distribute the chocolate and the extra marshmallows throughout the cereal mixture. Some of the chocolate will start to melt from the residual heat, creating delicious gooey pockets.
Step 4: Pressing the Bars
Carefully spoon the mixture into your prepared 9×13 inch baking pan. Now comes the slightly sticky part, but there are a few tricks to make it easier. You can lightly grease your hands with butter or cooking spray. Alternatively, and my preferred method, is to use a piece of parchment paper or a spatula that you’ve lightly greased or dampened with water. Gently press the mixture into an even layer in the pan. Don’t press too hard, as this can make the bars dense and tough. You want a gentle, even press to ensure they hold together. The goal is to create a relatively flat surface for easy cutting later on. Take your time with this step; a well-pressed bar will be much more satisfying to eat.
Step 5: Cooling and Cutting
Now that your S’mores Krispie Bars are pressed into the pan, they need to cool and set. Let the pan sit at room temperature for at least 30 minutes to an hour. You’ll start to see the chocolate pieces melting into luscious pools and the marshmallows firming up. Once the bars have cooled and set sufficiently, you can cut them into squares. If you lined your pan with parchment paper, this is where it’s a lifesaver. Lift the entire slab out of the pan using the parchment paper. Place it on a cutting board and use a sharp knife to cut it into your desired bar sizes. For best results, I like to cut them into about 2-inch squares. If the mixture feels too sticky, you can run your knife under hot water and dry it between cuts. These bars are best enjoyed the same day they are made, but they can be stored in an airtight container at room temperature for a day or two. The chocolate might get a little soft in warmer temperatures, but they will still be delicious. Enjoy your homemade S’mores Krispie Bars!
Conclusion:
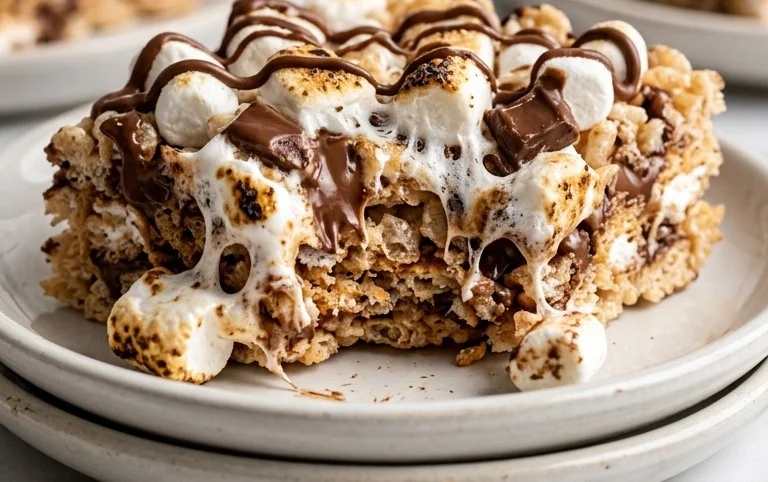
These S’mores Krispie Bars really are a no-fuss way to enjoy that classic campfire taste any time of year. They bring together the best of both worlds: the satisfying crunch and chew of a krispie treat with the irresistible flavors of s’mores. Because they’re no-bake, they are perfect for those hot summer days when you don’t want to turn on the oven, or for a fun, quick project with the kids. You can cut them into squares for easy serving at parties, picnics, or just for an after-school snack. For a little variation, try adding some mini chocolate chips along with the chocolate bars, or even a sprinkle of sea salt on top before the chocolate sets to enhance the flavors. Store any leftovers in an airtight container at room temperature for up to three days – though they rarely last that long!
Frequently Asked Questions:
Can I use regular marshmallows?
Yes, you can use regular-sized marshmallows. You’ll need about 30-32 regular marshmallows to equal the 7 cups of mini marshmallows. Melt them down with the butter as directed. Mini marshmallows just tend to melt a bit more evenly and quickly, but either will work.
How do I get clean cuts on my bars?
For the cleanest cuts, let the bars cool completely in the pan. Then, use a large, sharp knife. For extra clean cuts, you can lightly spray the knife with cooking spray or dip it in hot water and wipe it dry between each cut. This prevents the sticky marshmallow from pulling and smearing.
What kind of chocolate works best?
Hershey’s milk chocolate bars are classic for s’mores, but feel free to experiment. You can chop up other chocolate bars like milk chocolate with almonds, dark chocolate, or even chocolate chips. Just be aware that different chocolates will melt and set slightly differently, affecting the texture.
S’mores Krispie Bars
A delightful twist on classic Rice Krispie treats, these S’mores Krispie Bars combine the gooeyness of marshmallows, the crunch of graham crackers, and the richness of chocolate for an irresistible dessert.
Ingredients
-
6½ cups golden grahams cereal
-
4 tablespoons butter
-
7 cups mini marshmallows
-
3 bars (1.55 oz each) Hershey’s milk chocolate bars
Instructions
-
Step 1
Butter a 9×13 inch pan. -
Step 2
In a large saucepan, melt butter over low heat. Add 5 cups of marshmallows and stir until completely melted. -
Step 3
Remove from heat. Stir in the golden grahams cereal until evenly coated. -
Step 4
Gently stir in the remaining 2 cups of marshmallows and the chopped Hershey’s milk chocolate bars. Stir until marshmallows are slightly softened and chocolate is beginning to melt. -
Step 5
Press the mixture evenly into the prepared pan. Use a buttered spatula or wax paper to prevent sticking. -
Step 6
Let cool completely before cutting into bars.
Important Information
Nutrition Facts (Per Serving)
It is important to consider this information as approximate and not to use it as definitive health advice.
Allergy Information
Please check ingredients for potential allergens and consult a health professional if in doubt.